
MMS Groups
Introduction
Groups and Group Types play an important role in module administration. They can be used to track attendance (required for UKVI compliance) and to ensure that tutors get access to the correct students and their information.
Students can belong to one group in a group type, and the default group type in MMS is the ‘Tutorial’ group type, but additional groups types can be created. Each group type can have multiple groups. Once groups have been set up students can sign up to groups using the ‘Sign up’ tool and attendance can be marked using the ‘Attendance tracking’ tool.
This guide covers:
- Creating a group type
- Creating new groups
- Adding staff to a group
- Adding Students to groups
- View changes in student group lists
Creating a group type
Each taught module has the generic ‘Tutorial’ group type, but more group types can be created. To create a group type:
Note: New group types only need created if the module will have more than Tutorial groups.
- Access the Module Overview (see Figure 1 for links to the module overview in MMS and MySaint https://mysaint.st-andrews.ac.uk/)
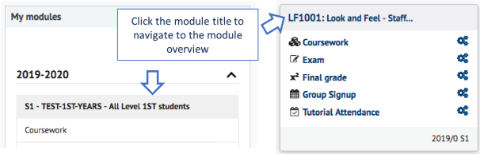
Figure 1: Module overview links in MySaint (left) and MMS (right) - Select the Students tab (see Figure 2).
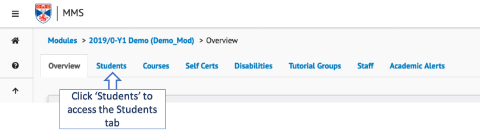
Figure 2: From the Module overview select the 'Students' tab - Scroll down to the Group Types section.
- In the New Group Type Name box enter the name of the new group, and click Add New Type (see Figure 3). The new group type will appear as a tab on the Module Overview.
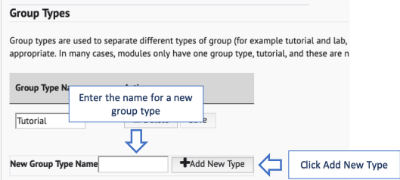
Figure 3: To add a new group type enter the name for the new group, then click the 'Add New Type' button.
Creating new groups
To create a new group:
- Go to the Module Overview (see Figure 1)
- Select the Group Overview by selecting the group tab (see Figure 4).
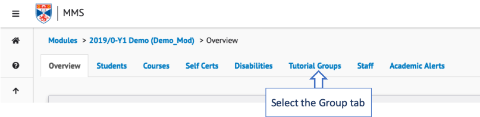
Figure 4: Link to 'Tutorial' groups tab. Each group type will appear as a separate tab. - In the Group Name field enter the name of the new group and click the Add Group button (see Figure 5).
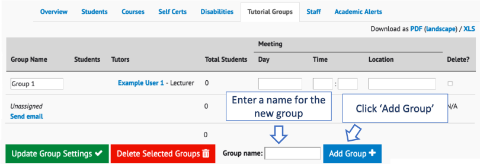
Figure 5: To create a new group enter the group name and click the 'Add Group' button. - The new group will appear in the table. Complete the configuration by entering a Day, Time and Location. Click Update Group Settings to save.
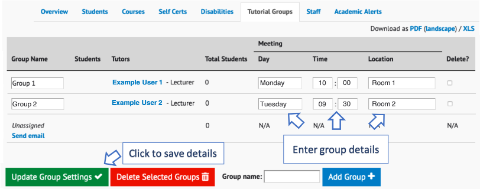
Figure 6: Enter the day, time and location of the group and click the 'Update Group Settings' button to save.
Adding staff to a group
Adding staff to a group has the following benefits:
- Staff will only have oversight of the students they are listed against, which is increasingly important from a GDPR standpoint
- Staff will see smaller student lists so Tool overviews will be less cluttered.
To add a member of staff to a group:
- Go to the Module Overview (see Figure 1)
- Select the Staff tab (see Figure 7)
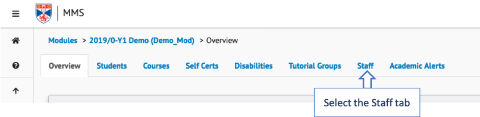
Figure 7: Select the staff tab from the Module Overview - In the Add staff to module section enter the name or username of the member of staff. As you type MMS will provide a list of possible staff members (see Figure 8)

Figure 8: Enter a staff name and select them from the list of possible users. - Select the member of staff by clicking on their name.
- From the Role dropdown list, select the required role (See Figure 9).
- From the Group dropdown list, select the group (See Figure 9).
- Click the Add button (See Figure 9).
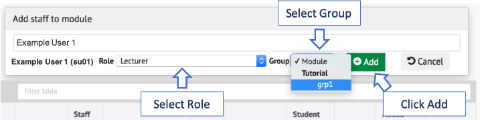
Figure 9: To add a user to a group, select the role, select the group and click Add. - The new role will appear on the table in the Staff tab (see Figure 10). This table can be filtered by typing the name of the member of staff, group or role into the ‘Filter table’ field.
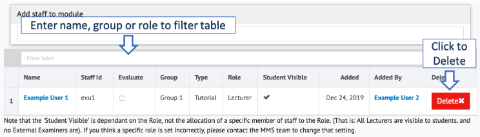
Figure 10: All staff added to a module are listed in the Staff table on Staff tab.
Adding Students to Groups
There are three methods of adding students to groups:
- Manually adding students to groups - add students individually to a group
- CSV Import - mass import students into groups from a spreadsheet
- Student Sign-up - have students sign up to groups
Manually Adding Students to a Group
To manually add students to a group:
- Go to the Module Overview (see Figure 1)
- Select the tab corresponding to the group type (see Figure 4)
- Scroll down to the Assign Students section (see Figure 11)
- Locate the student in the table
- Select the checkbox in the column corresponding to the required group
- Click Save Students’ Groups to save

Figure 11: Use the radio buttons to assign a student to a group and click Save Students' Groups to save.
CSV Import
To bulk add students to groups via a CSV import:
- Prepare a CSV file with the student’s username or matriculation number in the first column and the name of the group in the second column. Leave the group name blank to remove a student from all groups.
- Go to the Module Overview (see Figure 1)
- Select the tab corresponding to the group type (see Figure 4)
- Scroll down to the Import Students’ Groups from Spreadsheet (CSV) section (see Figure 12)
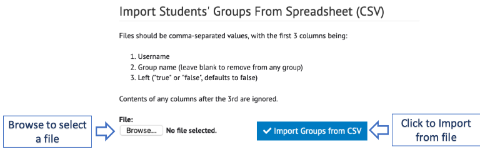
Figure 12: To import groups from a CSV file click the Browse button in the Import Students' Groups section - Click Browse to locate and select the file
- Click Import Groups from CSV
- On the next page review the proposed changes
- Click Update Student Groups
Student Group Signup
Once groups have been created (see ‘Creating new groups’) then a ‘Student sign-up’ tool can be created that allows students to sign up to the group most convenient for them. To create a Sign up tool:
- Go to the Module Overview (see Figure 1)
- Scroll down to the Tools section
- In Additional tools check the tick box in the Occasional section labelled Student group sign-up
- Click Create Tools
- A new tool will appear in the Tools table entitled Group Signup (see Figure 13).
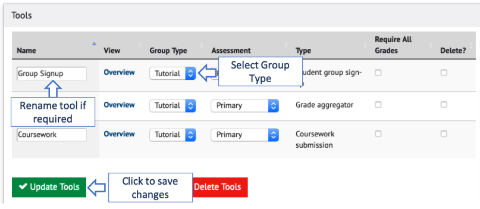
Figure 13: When creating a signup tool ensure that it is using the required group type - Change the tool name if required
- Select the group type from the Group Type drop down if required
- Click Update Tools to save any changes
- Click Overview in the View column to access the tool
- Select Configure from the navigation panel in the left
- On the Configure Group Signup page (see Figure 14)
- set a maximum number of students for a group
- a start date (if no start date is set students can sign up straight away)
- freeze date (after which students can’t change groups)
- any additional configuration options (see the Student Group Signup Tool guide for further details).
- Click Save Configuration to save.
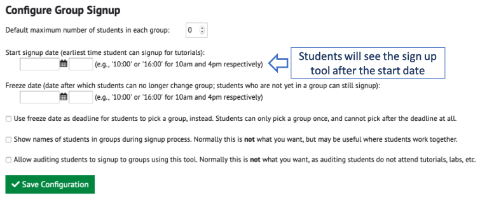
Figure 14: The default group size, signup start date and freeze date can be defined on the Configure Group sign up page
View changes in student group lists
Users with administration rights on the Student Group Signup tool can view changes to the group student lists over time:
- Select the Group Signup tool
- Select Configure from the navigation panel on the left
- Scroll down to the Changes in student lists section
- The table will list any changes in student lists
- Use the Filter table field to filter by student username, group name or date (yyyy-mm-dd)
Emailing Groups
Staff can send an email to a particular link using the 'Send email' link under the group name.