
Academic Alerts
This guide includes:
- What are Academic Alerts?
- How to view Academic Alerts for a module
- How to view Academic Alerts for a student
- How to create and issue an Academic Alert
- How to add notes and update the status of Academic Alerts
- How to add follow up notes
- How to change alert states
What are Academic Alerts?
Academic Alerts are a mechanism for directing UG and PGT students to deficiencies in their studies, and also directs them to sources of possible help and support where appropriate. In addition, the Academic Alerts system gives Schools/Departments a way of warning students of the penalties for non-attendance or non-completion of compulsory learning elements, and warns them of the consequences at an early stage.
Academic Alerts are handled via MMS, and are issued at the module level. They can be created and saved at any time, but will only be visible to students in MMS once they have been issued. An alert issued between 08:00 – 16:00 Monday to Thursday, or between 08:00 - 13:00 on Friday will be immediately issued to a student, and an email notification will be sent. An Academic Alert issued outside these hours will be deemed as issued out-of-hours and will sit as Pending until 08:00 the following working day, at which point the alert will be issued and the student will receive an email notification.
Once issued, an alert will change state to In Progress. With the exception of Final alerts, the student has four calendar days to act on the recommendation, at which point it can be marked as Resolved. If an alert has been issued in error it can be Revoked during this time. Alerts that are not revoked or marked resolved within the 4 calendar days will change status to Unresolved. Unresolved alerts can be marked resolved but cannot be revoked. Final alerts should not be marked resolved and should be left as unresolved.
Policies and further advice can be found by searching Academic Alerts in Policies, procedures and guidance.
How to view Academic Alerts for a module
To view the academic alerts for a module:
1. Go to the Module Overview using the links in MMS or via MySaint. See Figure 1 for links to the Module Overview in MMS and MySaint.
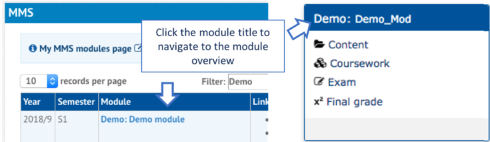
Figure 1: Links to the Module Overview in MySaint (left) and MMS (right).
2. Select the Academic Alerts tab (see Figure 2).

Figure 2: Academic Alerts can be viewed on the Academic Alerts tab.
3. Scroll down to the Existing Academic Alerts section (see Figure 3).
Figure 3: Example of an Existing Academic Alerts section
4. The default view hides revoked alerts but to toggle the visibility of different states, click the state buttons (see Figure 4).

Figure 4: Toggle the visibility of alerts based on their state by clicking the state buttons
How to view Academic Alerts for a student
Users with oversight of a student can view all Academic Alerts issued for that student. To do this:
1. Access the User Overview for a student, by clicking their last name anywhere it is displayed in MMS, or entering their username or student id into the Search function on the Modules page (see Figure 5)

Figure 5: To search for a student in MMS enter their username or student id into the Search field and then click Search MMS
2. Select the Academic Alerts tab (see Figure 6).

Figure 6: Click on the Academic Alerts tab on the User Overview.
How to create and issue an Academic Alert
To create an academic alert for a student on a module:
1. Go to the Module Overview using the links in MMS or via MySaint. See Figure 7 for links to the Module Overview in MMS and MySaint.
Figure 7: Links to the Module Overview in MySaint (left) and MMS (right).
2. Select the Academic Alerts tab (see Figure 8).
Figure 8: Academic Alerts can be viewed on the Academic Alerts tab.
3. Select the student from the Please Select a Student drop down list (see Figure 9).
4. Select the alert type relating to the situation you wish to issue an alert about (see Figure 9).
5. Click the Add Academic Alert button (see Figure 9).
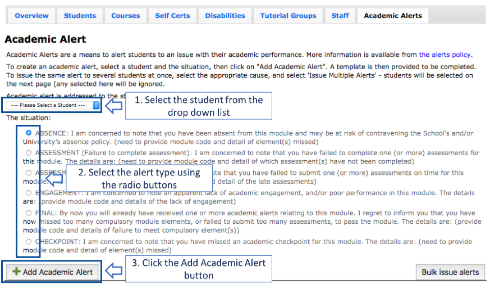
Figure 9: Create an alert by selecting the student, selecting the alert situation and then clicking the Add Academic Alert button.
6. Each type of academic alert will have a standard cc list of contacts that it will email when the alert is issued, these will be displayed at the top of the alert (see Figure 10). Additional email addresses can be added if required, to do this:
- Enter the full email address (including @st-andrews.ac.uk) into the New email address field.
- Click the Add e-mail Address button.
- Repeat for each additional email address.
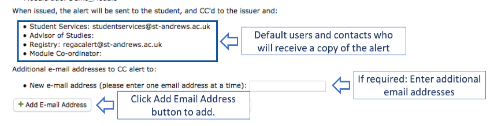
Figure 10: To add additional alert recipients, enter the full email address into the New email address field and click the Add Email Address button.
7. Complete the situation detail field, and complete any additional fields (these will depend on the alert situation) (see Figure 11).
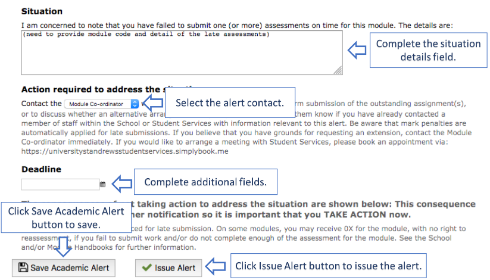
Figure 11: Complete the required fields and select an alert contact. An alert can be saved by clicking the Save Academic Alert button. To issue the alert click the Issue Alert button.
8. Select the contact from the Contact dropdown list. If the student is to be directed to a contact not in the drop down list then:
- select the Email Address option (see Figure 12).
- enter the full email address (including @st-andrews.ac.uk) of the contact option (see Figure 12).
- click the Save Academic Alert button to validate option (see Figure 12).
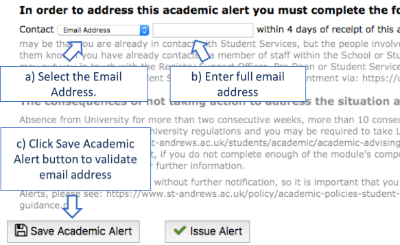
Figure 12: To add an additional reply to role select "Email Address", enter the full email address and click the "Save Academic Alert" button.
9. To save the alert in order to return at a later date/time, click the Save Academic Alert button (see Figure 11).
10. To issue the alert, click the Issue Alert button (see Figure 11). If an alert is issued between 08:00 – 16:00 Monday to Thursday, or between 08:00 - 13:00 on Friday it will be immediately issued to a student, and an email notification will be sent. An Academic Alert issued outside these hours will be deemed as issued out-of-hours and will sit as Pending until 08:00 the following working day, at which point the alert will be issued and the student will receive an email notification.
How to add notes and update the status of Academic Alerts
Once an academic alert has been issued, staff can add follow up notes and/or change the alert state.
How to add follow up notes
Follow up notes (also known as follow up action notes, or action notes) can be added to log information regarding the alert, including any actions taken by the student or staff involved. To add a follow up note:
1. Locate the alert on the Academic Alerts module tab (see section How to view Academic Alerts for a module) or the student Academic Alerts tab (see section How to view Academic Alerts for a student).
2. Click the Alert Serial to open the alert
3. Scroll down to the Follow up action notes section (see Figure 14).
4. Type the follow up note into the text field.
5. Click the Save Note button.

Figure 14: To create a Follow up note, type the note into the text field and click the Save Note button
How to change alert states
Alerts, other than the Final Alert type, may be marked revoked or resolved as long as their current state is ‘In Progress’.
To mark an alert as resolved:
1. Locate the alert on the Academic Alerts module tab (see section How to view Academic Alerts for a module) or the student Academic Alerts tab (see section How to view Academic Alerts for a student).
2. To mark the alert resolved select the checkbox in the Resolved column. The checkbox will be replaced with a date/time stamp indicating when the alert was marked resolved (see Figure 15).

Figure 15: Tick the checkbox in the Resolved column to mark the checkbox resolved.
To mark an alert as revoked:
1. Locate the alert on the Academic Alerts module tab (see section How to view Academic Alerts for a module) or the student Academic Alerts tab (see section How to view Academic Alerts for a student).
2. To mark the alert resolved select the checkbox in the Revoked column. The checkbox will be replaced with a date/time stamp indicating when the alert was marked resolved (see Figure 15).
Note: Alerts can only be revoked within 4 calendar days of being issued. If an unresolved alert needs revoked please contact itservicedesk@st-andrews.ac.uk.
|
Version |
Date |
Status |
Author |
|
V 0.1 |
18th June 2019 |
First Draft created |
Vad1 |
|
V 0.2 |
19th August 2019 |
Submitted for approval |
Vad1 |
|
V 0.3 |
20th August 2019 |
Final updates made to draft |
Vad1 |
|
V 1.0 |
20th August 2019 |
Draft stage complete |
Vad1 |
Have feedback on this guide? Contact fixit-mms@st-andrews.ac.uk.