
4 Entering exam marks
There are three main ways to enter marks into the Exam tool:
- Manually
- Via CSV upload
- Double marking
4.1 Manually entering exam marks
To manually enter marks into the exam tool:
- Access the Exam tool from the MMS Modules page or from the Academic activities workspace in MySaint (see Exams - Creating and access the Exam tool)
- Scroll down the table until you locate the desired student
- Enter the marks into the text fields provided (see Figure 4)
- Scroll to the bottom of the table
- Select the Save Marks button to save.
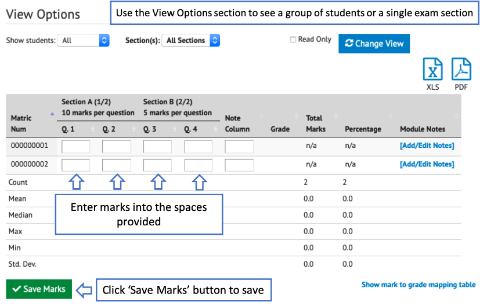
Figure 4: An example of the Exam tool overview. Enter marks into the space provided and click the Save Marks button.
The View Options section can be used to filter the table to show only a group, or questions in a section. To alter the view, select the required options from the drop down lists and click the Change View button.
4.2 Mark entry via CSV upload
To upload marks via a CSV upload:
- Prepare a csv file containing the student grades. The first column should contain the student matriculation number, and each grade column should be labelled with a lower case ‘q’ followed by a space and then the question number e.g. ‘q 1’, ‘q 2’ etc. An example is given in Figure 5. The file can be created in Microsoft Excel and then the File >> Save As function can be used to save the file as a csv file.

Figure 5: An example csv file for uploading exam marks. Each question should be labelled 'q' followed by a space and then the question number.
- Access the Exam tool from the MMS Modules page or from the Academic activities workspace in MySaint (see Figure 1).
- Scroll down under the mark table to the Upload CSV section.
- Select the Browse button and select the csv file for upload.
- Select the Upload Spreadsheet button.
- On the next page a table will display which marks MMS will upload into the Exam tool (cells with a blue background) and any that it can’t (cells with a red background). Review this to ensure marks will be uploaded to the correct location.
- Select the Save Marks button to save the marks (or navigate away from the tool if you do not wish to save).
4.3 Double Marking
The exam tool can be configured to allow double marking – a process where two markers enter marks and the system will highlight any disagreement.
To configure the exam tool for double marking:
- Access the Exam tool from the MMS Modules page or from the Academic activities workspace in MySaint (see Exams - Creating and access the Exam tool).
- Select the Setup Exam option from the navigation panel on the left.
- From the Single/double marking is handled as drop down list, select Two sets of marks; must agree with each other
- Select the Save Exam Paper Configuration button to save
- Return to the exam tool overview by selecting the Exam Results option from the navigation panel on the left.
- New options will appear in the View Option section at the top of the page (see Figure 6)
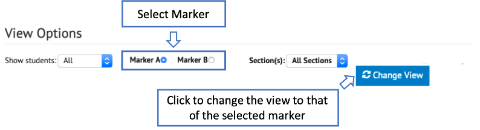
Figure 6: An example of the View Options section after Double marking is enabled. Use the toggles to switch views between markers.
To enter marks when using double marking:
- Access the Exam tool from the MMS Modules page or from the Academic activities workspace in MySaint (Exams - Creating and access the Exam tool).
- As part of double marking there are two markers – MMS has designated these A and B. From the View Options section at the top of the page, select which marker you want to enter marks as.
- Select the Change View button.
- Enter the marks manually or via CSV import (see section 4 Entering exam marks)
- Select the Save Marks button to save.
- If the marks entered by both examiners for the same question do not agree, the table cell with the mark will appear with a red background.
- To view the mark entered by the other marker – use the View Options section.
- Once the marks agree the cell background will return to its default grey colour.
Previous: 3. Configuring the Exam tool or Next: 5. Exam Reports and Charts