Lecture capture checklist
Updated on: 20 November 2024
Using lecture capture software to record live lectures
Using Panopto for lecture capture
Panopto is used to record all in-person lectures (hybrid lectures can be captured using Microsoft Teams.)
Follow the steps outlined in this guide to successfully setup Panopto for lecture capture.
Destination folder
Open the Panopto desktop application and check the destination folder is correct. This is normally the module folder for the current academic year.

If the destination folder is incorrect, type the module code into the box and available options will populate for you to select from.
In the event you cannot access the module folder, record into your 'My Folder' and move the recording into the module folder at a later date.
Primary sources
Check that an audio source is selected and that when you speak, the green blocks light up. If the yellow and red blocks light up, use the level slider to reduce the input volume until only green is lit when you speak.
Without a primary video source selected the sound level meter is horizontal.

Choose a Primary Video source if desired. You will see a preview above your selection.
With a primary video source selected the sound level meter is vertical.

If you are playing a video or audio file as part of your lecture from the same computer, tick ‘Capture Computer Audio’ otherwise the sound may not be recorded properly into your Panopto session.
Troubleshooting sound:
- An audio source must be selected for the record button to be available for use.
- Check the microphone is not muted via a mute button on the lectern, handheld or lapel microphone.
- Check the room AV panel and ensure your choice of microphone is not set to mute and that the level meter is up.
- Try selecting a different audio device from the drop-down menu.
- Mute the microphone when playing back audio to avoid adding an echo to your recording. Make sure to un-mute when the playback finishes.
Secondary sources
Select Secondary Sources.
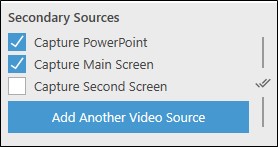
- Capture PowerPoint takes a screenshot of each lecture slide as they are displayed. (If using animations or playing back video in the presentation, you will need to capture the screen the presentation is delivered on.)
- Capture main screen records anything that is displayed on the main screen.
- If available, you may see the option to capture a second screen.
- If you have additional devices such as extra cameras available, you can add them to your recording using the 'Add Another Video Source' button.
Tick Enable screen capture preview to see a preview of a selected screen.

If playing back video in a presentation or directly on screen, ensure you set FPS to 15 as a minimum.

If you have time, make a quick test recording. Once uploaded and processed, play it back and confirm everything is captured as you expect.